Friday, October 20, 2017

Learning Techniques and Tech Tools to Make Them Happen

Recently I was listening to the Cult of Pedagogy Podcast and heard about the research of some cognitive psychologists on learning strategies.  In it, they talk about six learning strategies that help us develop our study skills.  I thought I would share this with you and also include some tools for making that happen in a technology rich environment.

First off, you can read the actual article here.  In it, the learning strategies are:

  1. Spaced Practice
  2. Retrieval Practice
  3. Elaboration
  4. Interleaving
  5. Concrete Examples
  6. Dual Coding

Many of the learning strategies we were taught growing up fall into one of these categories.  I do not write this blog post to talk about flashcards, but rather how a chromebook or mobile device can be used in the same way.

Spaced Practice is the same as chunking, and teachers structure their lessons so that they are introducing a small amount of new information and reviewing old information already.  With the use of Google Calendar and turning on alerts, we can show students how to remind themselves to work on a larger project a little bit at a time, such as essay writing and revising.  There are also student planners for chromebooks, such as My Study Life and myHomework.  Just a reminder that anything requiring an account may have restrictions for students under the age of 13 without parental permission.

Retrieval practice forces us to put away anything that might trigger a memory that might make us feel that we know or understand a concept, but without the trigger, we cannot recall the information.  The learning experts suggest writing or telling all the information on the topic so that you can see how much you can recall.  Then through this, any misconceptions can be corrected or you can make note of areas in which you could not recall enough.  

Chromebooks can be used to do this in a number of ways, from recording sound files of students talking about their knowledge, then a teacher can listen and give feedback, to a student taking a video of themselves talking and following the same procedure.  Sound recordings and video recordings can both be made directly on the chromebook, then saved to Google Drive, linked in Google Classroom, or sent via email to the teacher.  For sound recordings, I recommend Mic Note and for video recordings I recommend Soapbox.

For the elementary iPad setting, Educreations and Evernote are great options for this, but iOS 11 now has screen recording available, so students could actually be just using the camera and recording themselves with the camera facing them as they talk.

Elaboration goes hand-in-hand with questioning techniques and good class discussion, where the students are posing, answering, and facilitating discussion.  While face-to-face would always be preferable, it is possible to use discussion boards to work on this skill asynchronously and also have students provide evidence to support their claims.  Google Classroom and Schoology both work very well for this.  At the high school level, having students work towards providing citations to their discussion posts will prepare them for the requirements of higher education coursework.

Interleaving is mixing the repetition of a variety of skills so that students are forced to decide on the correct strategy to give the answer.  This is where project-based learning really shines because it is already mixing a variety of strategies and skills.  Writing, problem-solving, communicating, working well with others, planning a timeline are all elements we see in our projects.  Depending on the task, technology is usually a great tool for these ideas that we are already implementing in a great number of ways.

Concrete examples is something that teachers always do, but by having students come up with an example to explain an abstract idea of their own, it is more likely to stay with them.  It can be done in a number of ways.  The hardest part is not just drawing from a handful of students, so having every student contribute their concrete example to a Google Form or a discussion board can force them to create their own version that will stick with them as they learn because it can be personalized to their interests.  Exit tickets, Frayer models, and parking lots are other ways of having each student create their own.

Dual coding is my favorite because I am a visual learner.  To draw from what the authors said, it’s just combining the knowledge with a visual format:

“And when we say visuals,” Smith explains, “we don’t necessarily mean anything
specific, so it depends on the types of materials. You could have an infographic, a cartoon strip, a diagram, a graphic organizer, timeline, anything that makes sense to you so long as you’re sort of depicting the information both in a way with words and a way with pictures.”

“This isn’t just for students who are good at drawing,” Weinstein adds. “It’s not about the
quality of the drawing. It really just needs to be a visual representation as you can depict it.”

Another favorite for me is sketchnoting, and if you like Sylvia Duckworth, you know how effective mind mapping can be.  This is really powerful for students who like to doodle.  They will often come up with sketches so great that they are worth sharing with their classmates.

While this blog post has been long, I hope it has given you a variety of resources and ideas.  Please reach out if you have any questions and be sure to check out the websites of the Learning Scientists and Cult of Pedagogy.


Monday, October 2, 2017

Newspapers in the Classroom


National Newspaper Week began in 1940.  And today, almost eight decades later, “American newspapers are demonstrating their resolve each day to help readers determine fact from fiction and to inform the nation of all the important news and issues.” (Thomas W. Newton, Chairperson, 2017 NNW)

To celebrate, this Thursday (October 5), every student and every teacher will receive a copy of the Standard Journal.

Newspapers can be used in any classroom in so many different ways, and in all content areas.  Newspapers can improve literacy, highlight everyday math and science, and connect school to the world.  They contain practical vocabulary and “something for everybody,” like sports, weather, and entertainment.

Here are just a few ideas for using newspapers in the classroom.
  • Read a map
  • Find vocabulary words
  • Study stocks
  • Compare interest rates
  • Use classified ads and sports statistics for math problems
  • Analyze advertising
  • Determine bias in editorials
  • Read current events
  • Locate spelling and grammar mistakes
  • Create a classified ad
  • Write a letter to the editor
  • Make papier mache

And here are links to more ideas:
Lesson Plan: Today’s Front Page (written by a teacher in State College)

Newspapers are also available daily in all Warrior Run Libraries. If you’d like to spread out in your building’s library, just ask!


Wednesday, September 27, 2017

Empowering students

I spent the day with some other WR staff members at the MCL Summit in State College, PA.  As I listened to students and teachers and administrators from other schools talk about what they are doing and how, I thought about the small ways that we are already empowering our students.  Here are some of the great instructional practices that already exist at Warrior Run.


Having students work toward the standard but letting them decide the product.  While students might need to work on their writing skills, they are allowed to do so in different forms, from researching a passion project to blogging about a favorite hobby.  Being engrossed in the topic allows them to feel that there is a purpose to the activity beyond school.  When students make connections to the real world, they stop asking “why do I need to know this?”


Encouraging discussion and debate.  In the information age and an era of fake news, students have to be mediators of their digital diet.  Being able to distinguish fact from opinion and research from rhetoric will help them refine their synthesis skills in order to venture through the current media and political landscape.  As teens struggle to find themselves and define who they are, this can look like challenging a teacher.  While respect is necessary, sometimes students are more of an expert on certain topics, especially as the internet makes it possible to develop skills outside a traditional setting.


Transforming the classroom.  While a teacher with a board at the front of the room with students in rows is the traditional understanding of a classroom, research suggests that today’s learners, who are constantly connected to the world through their phones, need a wide variety of instructional strategies.  Direct instruction has its place, but so do collaborative groups, independent work stations, and other types of blended learning.  In order to optimize these strategies, sometimes a classroom transformation is necessary.  Elementary teachers are the experts of maximizing the classroom space, with different areas of the class for different tasks.  As students grow, the most important aspect is flexibility.  I was recently inspired by a number of ideas (see this, this, and this), but I really enjoyed this website for planning the layout.


Encourage risk-taking and failed attempts.  Just in the same way that parents or teachers model a love of reading to children by demonstrating that they read for their own enjoyment, teachers can model a growth mindset by sharing their stories of risk-taking and failure with their students.  Life is messy and students who realize it won’t be perfect and instead develop resiliency will be more likely to try difficult tasks and succeed.  Knowing that a teacher will be there for them when their plans don’t work out creates the necessary self-esteem (and safety net) to be willing to work through complex tasks.  My favorite example that a teacher created was an #epicfail wall where students shared their funny attempts that failed.


Creating time for reflection.  One of the most important parts of the learning process is reflection.  The feedback supplied by a teacher is so much more meaningful when internalized by a student.  Think of those moments when you couldn’t stop dwelling on an event - it stuck with you, right?  You won’t forget what you learned from that experience.  Allowing an opportunity to review the feedback and discuss it with the teacher will encourage students to reflect, but so will modeling.  A teacher can share how they reflect by talking aloud about their thinking.  When our kids make a mistake, like trying to open their yogurt upside down, my husband will ask, “What did you learn?”  While he’s doing it to lighten the mood and make the kids laugh, they instantly reflect on what went wrong.  Do they learn?  Sometimes.


Many of these ideas are not new to this generation, they are just meaningful experiences that we know develop our students into well-rounded adults.  As you reflect on how to incorporate them into your class, take pride in the fact that I was inspired by seeing the work of Warrior Run teachers.


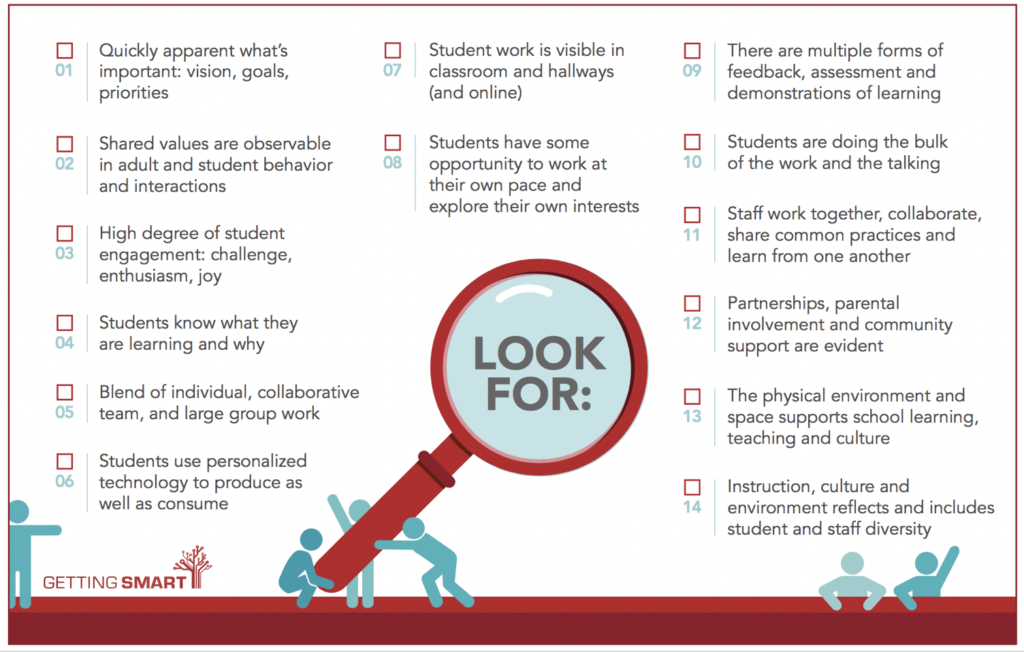
Image from a Getting Smart article on Student-centered learning

Wednesday, September 20, 2017

Embed Your Google Calendar on Your Sapphire Page

Here's a step-by-step tutorial for embedding your Google calendar into your CLASS PAGE on Sapphire.

PART 1 - Get the URL for your Google calendar

If you use "New Calendar," click here for instructions.
If you use "Classic Calendar," follow the instructions below.


In your Google calendar, find your list of calendars on the left hand side.  Click the dropdown arrow for the calendar you’d like to share.  Choose “calendar settings” from the menu.


In the “calendar address” section, toward the bottom of the page, click the blue HTML button.  A window will pop up that says, “calendar address.”  Highlight and copy the URL from that window and click OK.


PART 2 - Put your calendar on your Sapphire page


Go to your class page.


While editing your content, click the little pencil icon in the upper right corner.  Then click the icon with the globe.  (When you hover your mouse over the globe icon, it will say “iFrame.”)


A window will pop up called, “IFrame Properties.”  Paste your calendar’s URL in the space provided.  (To get your calendar’s URL, see Part 1.)  In the “width” and “height” fields, put “800” and “600” respectively.  Click OK.


You will see the frame of the calendar in your content field.  Click Save, on the left.


When you are successful, your calendar will appear on your page.


If you have any questions, please just email me: lbrobst@wrsd.org

Wednesday, September 13, 2017

Saving class time with typing shortcuts

One gripe that I have heard a lot about students in the past five years is the lack of typing skills and the way that this interrupts instructional time.  While our district has taken steps to add to the time focusing on building these skills, there’s still only 24 hours in a day, so I thought I might share some ways that you can limit the typing for students or allow them to work on these skills during free time.


  1. Use the shelf on the chromebooks or create webpage icons on the iPads.
  2. Bookmark pages that students will visit frequently.
  3. Use a URL shortener like goo.gl or tinyurl.com.
  4. Share to them in Hapara/Drive/Email and tell them where to find the link.
  5. Also in Hapara, push out a link to all students.
  6. Create a Symbaloo page for your class with all the links you need.  Students can have a shortcut to that, and then just click the tool they will use that day.
  7. Use QR codes to login (Greg is working on this for Elementary).
  8. In Chrome, use the App Launcher.
  9. In iOS, Air Drop to your students.
  10. Allow students to use one of varying typing skills websites, such as typing.com or nitrotype.com, if they finish their work early.

If you have questions or need help with these items, please let me or one of your building tech helpers know.  We will always be glad to help.  Together, we will make 21st century learners that know where to find the W on the keyboard.

Image result for typing funny

Thursday, September 7, 2017

Sapphire Test Builder


Sapphire, our new Student Information System (SIS) allows us to do a lot of things.  To name just a few, we can take attendance, manage grades, and see student schedules.  Additionally...

In Sapphire, we can also create, give, and grade tests.*

As Sapphire explains, this tool "enables teachers to create any type of online test, homework or survey; set time limits; shuffle questions; monitor, auto-grade and allow retakes. District, building, grade, subject or common core-level question banks encourage the use of proven standards and districtwide sharing. Images, audio, video, threaded discussions and digital content can be added to course web pages. By combining the capabilities of the Teacher Gradebook and Test Builder, teachers are able to author and deliver virtual courses and classrooms."

You can use Sapphire's Test Builder at ALL LEVELS in ALL CONTENT AREAS.

Getting Started
After logging into Sapphire, choose "Test Builder."

The Test Builder page looks like this.

Click "Create New Test," then start adding questions.

When you're done, you can assign it to your class(es).  Students' tests can be graded immediately, then automatically uploaded to your Gradebook.  Having this Testbuilder directly connected to your Gradebook within Sapphire will make for smooth transitions.

Below, I've included links to incredibly helpful tutorials.  Please use them at your convenience.  If you need help, please just ask!


Helpful Information

This comprehensive manual will take you through the process from beginning to end, with "what if" scenarios as well.  (It's also embedded below.)

Videos

You can access the manual and the videos by clicking the HELP button in Sapphire, on the upper right corner of your screen.  Just type "test builder" into the search bar.

*If you were previously using Lightning Grader, please use Sapphire's Test Builder from now on.


Thursday, August 31, 2017

Chromebook tips and tricks

As we roll out a device to (almost) every student in our district, I thought these few bits of information might be helpful to teachers.


  1. In place of the function keys at the top of the keyboard, there are a number of icon keys which serve some of the same purposes.  Here’s what they do:
Image result for chromebook top keys shortcuts


2. The black bar at the bottom of the screen is called the shelf, and you can “pin” pages there that you want kids to be able to open quickly.  This is especially helpful as an initial setup for our slowest typers. Then it can act like a bookmark for the future.
To do so, just two finger tap the icon of the app/website and say, “Pin to shelf”; if it’s a website, when you have it open, click the three dots in the top right-hand corner and select, “Pin to shelf.”


3. To scroll on a chromebook, use two fingers on the touchpad to push up or pull down.  Hint: this also works on your laptops, teachers.  To right click, tap two fingers on the touchpad.


4. For classroom management purposes, chromebooks can be a distraction.  When entering the classroom, you can use signals to let students know expectations.  For example, use a stoplight to indicate how you will start class.  Red means no device needed, so put it under your seat.  Yellow means not yet.  Green means get ready to go!  Another favorite is “Lids at 45” so that eyes can be on you.  I’m in favor of closing lids to get their full attention, but sometimes goofy things happen when opening them again, so lids at 45 at least removes it from their line of vision.


Chromebooks have lots more fun tips that our students may know more than us.  Don’t be afraid to explore or ask for help!